Building a Blog With Hugo - Part 5
You finished customizing your site and wrote your first blog entry. Now let's get it published to Github so others can enjoy it and share it with the world.
It’s been a long time since I last updated this series. I apologize to anyone who is following it and lost interest. I hope to be quicker in future series I write.
Introduction
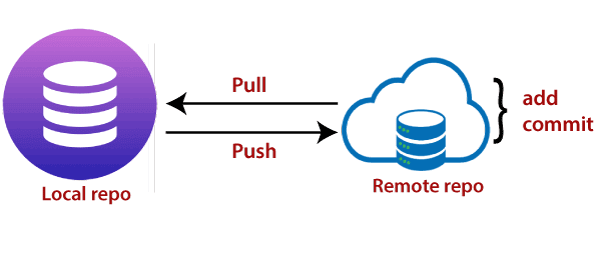
In this post, I will walk through what I do to publish my blog to Github. I use private and public repositories and GitHub Desktop. This way, I can do some testing in my private repo before pushing it to my public repo.
Github Desktop
As I mentioned in the introduction, I use Github Desktop for performing commits and pushes to my repositories. So, to follow along, you will need the software installed.
I’m not going to detail how to install the software because Github has done an excellent job documenting it. You can find the link to download the software here. Once you get it downloaded, you can refer to the installation and configuration steps over here. After you install Github Desktop continue to the next section.
Committing Code
I use Microsoft Visual Studio Code (VSCode) for all of my blog work. The nice thing about it is that git is built-in. It also has a parser for markdown. If you are comfortable with the git CLI, you don’t need Github Desktop. Alas, I’m not as up to speed on the git CLI. This is why I stick with Github Desktop. I will get there eventually.
In Part 2: Creating your first Hugo site, I walked through the steps for creating a local repository on your development computer and adding the submodule for the Hugo Theme. To make the local repository something that Github Desktop is aware of you need to add it as a local repository. In Github Desktop click the File menu, select Add Local Repository.
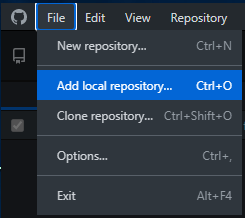
Add Local Repository
The following dialog box appears. Click the Choose button and select the folder where you saved your local repository. Then click the Add Repository button.

Choose Local Repository Directory
After you click the button, you will see the following dialog box.
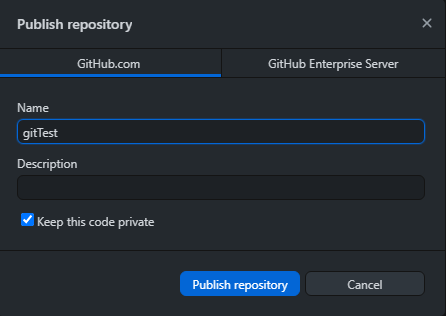
Publish Repository
You can accept the same repository name (I suggest sticking with the same name) on Github.com and if you want to make this repository private. This is what I have done for the repository I use for my development Hugo site. After publishing your repository you may see the following puzzling message. This just means that you haven’t committed anything to the local repository.

Unborn head issue
So, all you need to do is create a commit to your local repository. If you have been following along with the entire series you should have a bunch of files to commit. Github Desktop will recognize this. You should see something similar to the image below.
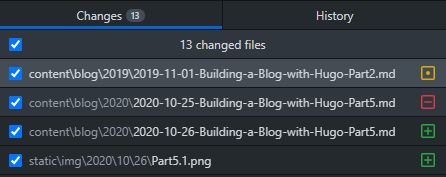
Changes to Local Repository
The green plus sign indicates the file is new. The yellow dot indicates a file has been changed. The red minus sign indicates a file has been deleted. You can hover your mouse over any the icons that show up in the window to learn their meaning.
Now let’s commit the files to the repository. In the bottom left of the Github Desktop window you will see an area where you can enter a summary of what you want to commit to the repository along with a more detailed description of the commit.
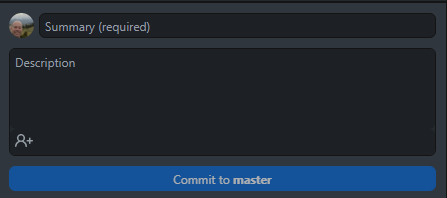
Commit to Github area
After you have filled in the summary of the commit (this is required) and a more detailed description (this is optional), click the Commit to master button.
Now you are ready to publish your master branch with changes up to Github. Click the Publish branch button.
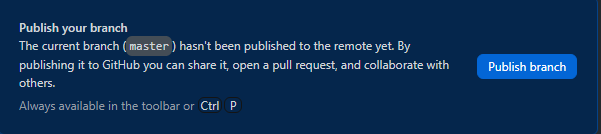
Publish to Github
Nice! You just published your local repository up to your private repository on Github.
For future changes to any file or directory in your local repository all you need to do is commit your change(s), like you just did then click the Push to origin button near the top of the Github Desktop window.

Push to Origin
Push Changes from Private Repo to Public Repo
Up to this point I have shown how to commit files to your local repository and publish/push them up to Github. Now, we want to take our changes and push them up to the public repository on Github so our blog can be published for the world to read.
I take the simple approach to making this all happen. After running some local tests to make sure the blog looks right in my local repository I commit them up to Github using the steps I just outlined. Then I simply copy and paste the entire directory structure of my private repository to the public repository I have synchronized to my local system.
If this is the first time you are doing this operation then every file and folder will be new. Create a new commit to the local copy of your public repository and then push that up to Github.
For subsequent changes I let Windows inform me what files/folders conflict because of the same name. I click the button to replace them. Once the copy is complete I create a commit to the local repository and then push them up to Github. That’s all there is to it.
Summary
Let’s summarize what we covered in this post:
- You got Github Desktop installed and linked to your Github account
- You made your first commit to your local respitory and pushed/published it to Github
- You pushed changes from your Private Repo to your Public Repo
Thanks for reading this far and for reading this series. I plan to add some other steps to the series eventually, but for now this should get you going. I hope it has helped you?
Series Table of Contents
Here are links to the rest of the series:
- Part 1: A quick introduction to GitHub Pages and Hugo
- Part 2: Creating your first Hugo site
- Part 3: Customizing your theme/site
- Part 4: Configuring Google Analytics
- Part 5: Publishing your site
If there is something you think I’m missing and feel should be added, please let me know.