Building a Blog With Hugo - Part 2
Creating your first Hugo site and blog post
In the first part of this series, I wrote about why I chose to use Hugo to develop this blog and GitHub Pages to host it. In this post, I’m going to walk through the steps to create a Hugo site, apply a theme, and create a very simple blog post. So, let’s get going!
Before You Get Started
Before you get started, you need to gather a few bits and bytes.
- You need to download and install Hugo. Refer to my first post in this series on where to download the binaries for your preferred operating system.
- You need a GitHub account.
- You will need git installed on your development system.
- I recommend following the steps over at the GitHub Help site to set up git on your system.
- I primarily use GitHub Desktop instead of the git CLI. But, I also installed the “CLI version” of git on my system. If you are comfortable using git CLI commands, then there is no need to get this piece of software. I find this easier for bulk commits and pushes up to my repositories. Eventually, I will get around to learning how to use the git CLI commands better.
- You can find the latest git installer over at the Git project site.
- You should consider learning markdown. I refer to markdown as shorthand HTML code/formatting with less complexity. Here is a great markdown cheatsheet to use as a reference.
- You need a text editor for creating and editing the files behind your site. I highly recommend Microsoft Visual Studio Code. It’s available for Linux, MacOS and Windows. Most examples and screenshots will be from within VSCode and the built-in terminal in VSCode.
After completing all of this you are ready to get going.
Creating Your First Hugo Site
Now that you have Hugo installed and a GitHub account you are ready to create your first site.
FYI. I use Windows for developing my site. So, you may need to make adjustments to any of the code snippets I post in the event you aren’t using Windows.
Begin by creating a directory where your site development will take place. In my case this is the “GitHub” directory in my “Documents” folder.
Change to this directory and issue the following command to create a new site.
PS C:\Users\Administrator\Documents\GitHub> hugo new site exampleSite
Congratulations! Your new Hugo site is created in C:\Users\Administrator\Documents\GitHub\exampleSite.

Just a few more steps and you're ready to go:

1. Download a theme into the same-named folder.
   Choose a theme from https://themes.gohugo.io/ or
   create your own with the "hugo new theme <THEMENAME>" command.
2. Perhaps you want to add some content. You can add single files
   with "hugo new <SECTIONNAME>\<FILENAME>.<FORMAT>".
3. Start the built-in live server via "hugo server".

Visit https://gohugo.io/ for quickstart guide and full documentation.
This will result in a directory listing that looks similar to the following:
PS C:\Users\Administrator\Documents\GitHub\exampleSite> dir

    Directory: C:\Users\Administrator\Documents\GitHub\exampleSite

Mode                LastWriteTime         Length Name
----                -------------         ------ ----
d-----       10/13/2019  11:01 PM                archetypes
d-----       10/13/2019  11:01 PM                content
d-----       10/13/2019  11:01 PM                data
d-----       10/13/2019  11:01 PM                layouts
d-----       10/13/2019  11:01 PM                static
d-----       10/13/2019  11:01 PM                themes
-a----       10/13/2019  11:01 PM             82 config.toml
This is the basic directory layout for a Hugo site.
If you are curious about the directory structure Hugo initially creates jump over to the write-up about Hugo Directory Structure.
Adding a Theme
It’s possible to begin developing your site right away. But, it will be easier to apply a Hugo Theme. My blog is using the Hugo Future Imperfect Slim theme. So, I’m going to use it in my examples.
From the root of the site directory issue the following commands:
# This creates and initializes an empty Git repository on your local machine
PS C:\Users\Administrator\Documents\GitHub\exampleSite> git init
Initialized empty Git repository in C:/Users/Administrator/Documents/GitHub/exampleSite/.git/

# This adds the Hugo theme as a Git submodule to the site directory
PS C:\Users\Administrator\Documents\GitHub\exampleSite> git submodule add https://github.com/pacollins/hugo-future-imperfect-slim.git themes/hugo-future-imperfect-slim
Cloning into 'C:/Users/Administrator/Documents/GitHub/exampleSite/themes/hugo-future-imperfect-slim'...
remote: Enumerating objects: 22, done.
remote: Counting objects: 100% (22/22), done.
remote: Compressing objects: 100% (18/18), done.
Rremote: Total 2243 (delta 6), reused 9 (delta 3), pack-reused 2221
Receiving objects: 100% (2243/2243), 7.04 MiB | 15.71 MiB/s, done.
Resolving deltas: 100% (1255/1255), done.
warning: LF will be replaced by CRLF in .gitmodules.
The file will have its original line endings in your working directory
This is what the directory listing will look like in VSCode.
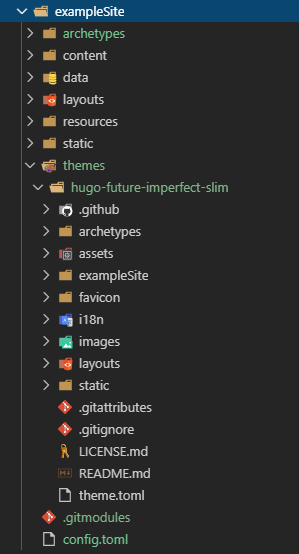
Theme directory listing
Take note of the redundant directories in the populated, themes directory and the exampleSite directory in the themes directory. We will be copying some of those directories to get the site up and running quickly.
In the image below you will see the numbered directories, content (1), resources (2), static (3) and a the config.toml (4) file. Copy the contents of the content, resources and static directories in the bottom of the image to their corresponding upper location. Then copy the config.toml file (labled as #4) and copy it to the root of your site.
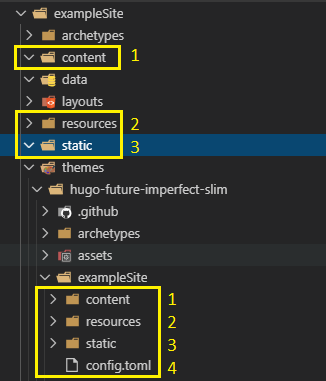
Directories to copy
Once you copy all of the neccessary folders and their contents and the config.toml file to the proper locations you are ready to see what your site it starting to look like.
Move to the root of your site. In my case it is: C:\Users\Administrator\Documents\GitHub\exampleSite and issue the hugo server command:
PS C:\Users\Administrator\Documents\GitHub\exampleSite> hugo server
port 1313 already in use, attempting to use an available port
Building sites …
                   | EN | DE | FR | PL | PT
+------------------+----+----+----+----+----+
  Pages            | 26 | 14 | 23 | 23 | 16
  Paginator pages  |  2 |  0 |  2 |  2 |  0
  Non-page files   |  0 |  0 |  0 |  0 |  0
  Static files     | 12 | 12 | 12 | 12 | 12
  Processed images |  0 |  0 |  0 |  0 |  0
  Aliases          |  7 |  3 |  5 |  5 |  3
  Sitemaps         |  2 |  1 |  1 |  1 |  1
  Cleaned          |  0 |  0 |  0 |  0 |  0

Total in 645 ms
Watching for changes in C:\Users\Administrator\Documents\GitHub\exampleSite\{archetypes,content,data,layouts,static,themes}
Watching for config changes in C:\Users\Administrator\Documents\GitHub\exampleSite\config.toml
Environment: "development"
Serving pages from memory
Running in Fast Render Mode. For full rebuilds on change: hugo server --disableFastRender
Web Server is available at http://localhost:51534/ (bind address 127.0.0.1)
Press Ctrl+C to stop
NOTE: If you receive the error “TOCSS … this feature is not available in your current Hugo version” then you may need to install the extended version of Hugo on your development machine. You can get more details at this link on how to proceed.
Ctrl + click on the URL and you should see something similar to the following:

ExampleSite homepage w/o any customization
Click around the site and briefly check it out. After you’re finished exploring, we’ll walk through creating a simple blog post. Don’t worry about customizing the site yet. We’ll get to that in a fugure post.
You may be wondering why I received the error about “port 1313 already in use.” I got this harmless, error because I have my dev site running simultaneously while I write this post. Yes, you can have multiple hugo web servers running simultaneously. Under normal circumstances, you won’t see this.
Press Ctrl+C to stop the web server.
Creating a Blog Post
Before you can start creating blog posts there is some work that needs to be done. You can manually create content files (for example as content/<CATEGORY>/<FILE>.<FORMAT>) and provide metadata in them, however I prefer to use the hugo new command to do a few things for me (like add a title and date automatically to a new post). Run the following command from the root of your site.
# command to create a new blog post
PS C:\Users\Administrator\Documents\GitHub\exampleSite> hugo new blog/my-first-post.md

# output from the hugo new command
C:\Users\Administrator\Documents\GitHub\exampleSite\content\blog\my-first-post.md created
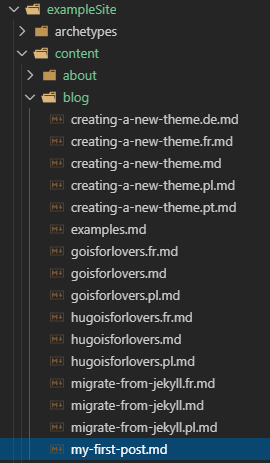
This will create a new file named: my-first-post.md and save it in the <site root>/content/blog folder as you can see in the image below.
First blog post location
The nice thing about creating a new blog post this way is that it is stored in the correct location and has, in Hugo terminology, front matter. What is front matter? In a nutshell, it’s metadata about or in a file. For a blog post, there is metadata in the very beginning of a post, such as:
- Date
- Slug
- Description
- Title
- Tags
- Categories
There are other front matter items that can be added in a post, that’s just a sample. For more information on the topic, take a peek at this link on the subject.
Open your new post and you will see the following at the very beginning of the file:
+++
author = ""
categories = [""]
date = ""
description = ""
images = [""]
linktitle = ""
title = ""
type = "post"

+++
Go ahead and enter values (obviously between the quotation marks) for author, categories, date, description, and title. Then enter some text below the three plus signs “+++” and save the file. Oh yeah! Make sure you enter today’s date in the format of year-month-day (2019-11-01). Otherwise, your post may not show up. Ignore the images front matter item for now. Afer entering some text for the values and post text start up the web server.
hugo server
You should now have your first blog post on your new site.
In the next post in this series I’ll go over some steps to customize the theme and site.
Series Table of Contents
Here are links to the rest of the series:
- Part 1: A quick introduction to GitHub Pages and Hugo
- Part 2: Creating your first Hugo site
- Part 3: Customizing your theme/site
- Part 4: Configuring Google Analytics
- Part 5: Publishing your site
If there is something you think I’m missing and feel should be added, please let me know.